Azure networking can seem a bit overwhelming for non-networking folks. Since Azure started providing the new ‘resource management’ style VMs, one can feel far more exposed to these individual network components. This hit me when trying to find how to add additional endpoints to my new VM - I remember with classic VMs it being quite easy (it was tightly coupled to the VM) but struggled to find it with the new types.
When you create a new resource managed VM, Azure will also create a few other resources by default:
- Storage (not covered in this post)
- A virtual network (with 1 subnet)
- A network interface
- A public IP address
- A network security group
In this post, I’ll go through what these resources are and how they fit together. I’m not intending to cover everything in great depth, but hopefully help developers through that “where do I start?” phase.
Virtual networks (VNETs) + subnets
A virtual network differs from a physical network in that the physical wires and switches of the network might not exist but be achieved by various network virtualisation methods. However, in terms of a basic conceptual model, there’s nothing wrong with imagining a virtual network as a bunch of wires and routers you might lay out on your floor at home. A virtual network is simply some resources in Azure connected together on a network, exactly like you have at home or in the office. Azure provides the other stuff needed to make a network function, such as DHCP (to assign IP addresses to resources on the network), DNS, subnetting, default gateway, route tables etc.
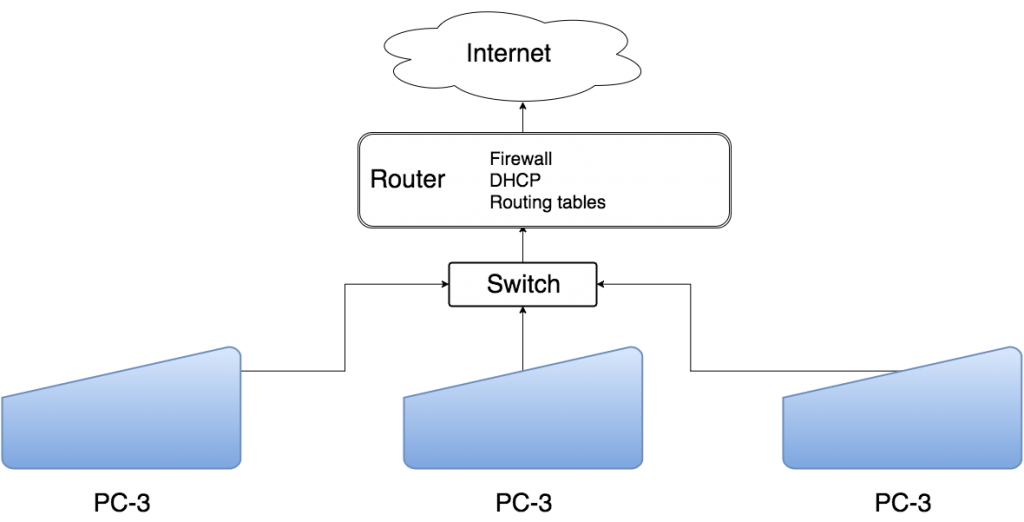
In Aure, the PCs here might be VMs, and for basic networks you don’t have to worry about the switch and the router/DHCP/routing functions - these come baked in. All you really have to think about is getting your VMs on the same VNET and configuring the firewall.
Address ranges
Within the virtual network settings, you can configure the address ranges for your network. The address range specifies which IP addresses can be assigned to devices on the network. By default, you get 10.0.0.0/16, which means the addresses on the network could be anything in 10.0.0.0 - 10.0.255.255
CIDR notation and subnet masking
So how does 10.0.0.0/16 correspond to allowing IP addresses in the range of 10.0.0.0 - 10.0.255.255? To answer that question, you need to understand subnet masking and CIDR (classless inter-domain routing) notation. A subnet mask simply defines how much of an IP address is identifying a network, and how much of it is identifying a resource on that network. A subnet mask looks like this:
255.255.0.0
This subnet mask tells us that the first two numbers in an IP address are dedicated to identifying the network of the resource, and the last two identify the specific resource.
In CIDR notation, the ‘/16’ represents the number of leading ‘1’s in the binary representation of the subnet mask for the VNET. So in this case:
The subnet mask is 255.255.0.0 which is 11111111.11111111.00000000.00000000 (16 leading 1s) This means 0.0.x.x - 255.255.x.x represents the actual network, and the last two numbers in the IP address represent the resources. So for this particular network, it’s interested in requests that are targeting IP addresses starting in 10.0, and the final two numbers are resource specific.
Subnets
A subnet is simply a logical division of a larger network. For example, you might have 2 subnets within a VNET. Subnet 1 has IP addresses of 10.0.1.0 - 10.0.1.255, and subnet 2 has IP addresses 10.0.2.0 - 10.0.2.255. The address range of the VNET allows this, because of the subnet mask.

Remember that it’s the network interface associated with the VMs that are associated with the subnet, not the VMs themselves. The route table is not created by default, but you can create one to override default behaviour.
You can set up multiple subnets within your VNET. The default subnet is 10.0.0.0/24. So the subnet mask has 24 leading 1s, so it’s 255.255.255.0. This means the subnet address is 10.0.0.x, and the resource is identified by that last number. This means you can only have 256 resources within this subnet.
You could create another subnet with the address range 10.0.1.0/24, which would be fine as the subnet identities would not overlap: the default subnet is at 10.0.0.x, and your new subnet is at 10.0.1.x.
VMs in different subnets but on the same VNET can communicate with each other by default because Azure automatically configures the routing between subnets. This would not be the case on a normal network as TCP/IP does not allow it by default. Say you wanted to isolate these subnetworks so the VMs can’t talk, how would that work?
Route tables
Route tables allow communications from subnets to be routed to specific destinations. For example, you might want all internet traffic from a subnet to be routed via an on-premise proxy server. As mentioned, Azure allows communications across subnets within the same VNET by default.
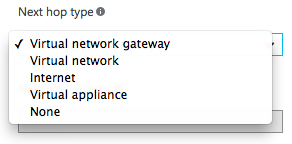
Route tables allow you to set up rules that specify where requests to specific destination addresses should be routed. Azure provides several options for the “next hop” - where the request should be routed. These include Internet, Virtual Appliance (e.g. a VM containing a firewall), and none (the packets will be dropped).
For the average Azure deployment, you won’t have to worry about this too much. It’s only if you have several subnets and want to specify where certain traffic will be routed (e.g. when configuring a DMZ).
Network interface (NIC)
Think of a network interface like a network card in a desktop PC. A PC could have multiple network cards if you have the software to handle it, and each one is plugged into the local area network via an ethernet cable. It’s no different in Azure - a VM can have one or more network interfaces, and each network interface has its own IP address on the local network and can be connected to different subnets. Each NIC has its own IP address and MAC address, just like ‘real’ life.
When a VM is created with the default settings, you get a NIC which is already associated with your new VNET (via a subnet), so there’s not much configuration to do. If you find yourself needing to create more NICs, it’s worth noting they have to be associated with a specific subnet (i.e. you can’t associate a NIC with a VM that isn’t in a VNET).
(To have multiple NICs per VM, you have to have VMs of a certain size).
Public IP addresses
Public IP addresses are entities in their own right and can be associated with various network resources in Azure. A VM can be exposed to the internet because it is associated with a NIC (or load balancer) that is associated to a public IP address. Public IP addresses can be dynamic or static (there is a cost difference if you have enough IPs reserved), and have a DNS name defined (this adds an A record for the IP address - the domain is something like yourapp.northeurope.cloudapp.azure.com).
The most common use for these entities is associating them with NICs and load balancers.
Network security group (NSG)
A network security group is better thought of as a permissions object. It allows you to apply firewall-y permissions to data passing through types of network resources. This is the entity you’ll probably modify the most if you’re doing simple deployments.
NSGs can be associated with NICs and subnets. If you assign an NSG to a NIC which is within a subnet that also has an NSG assigned to it, the rules are applied in order of the direction of traffic (so incoming traffic will go through the subnet NSG before the NIC NSG, and for outgoing the reverse is true).
It is within an NSG you configure those endpoints that you might be missing from the classic VM days.